The mounting holes lined up perfectly; I was worried that 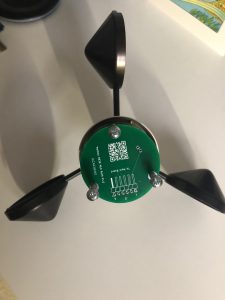 I might have to do some (ulp) physical modification with a small round file. The first image shows that (amazingly) the holes do line up (yay!). The second image shows that the outer housing smoothly slides over the PCB. No bad engineering for a newbie KiCad project. I did apparently mess up on a couple small things: the QR code and the placement of the JLCPCB order number. I thought for sure I checked the specify location box under high-spec options, and I did put the text JLCJLCJLCJLC in the silkscreen layer at a place I thought to be good per the site instructions.
  I apparently failed to check that option. Oh well. The other thing I messed up was the QR code. Apparently, I didn’t read the fine print when I created the QR; when the QR is scanned it goes to some site called qr.code, and you need to have one of their “plans” to use it. Like $35!! 😮 I only want ONE QR code. Jeez. Oh well, this was an experiment anyway. Now to solder the SMT devices to the PCB. Definitely need to practice some here lest I hose up a board, or worse, toast a MLX90316 angle sensor! SMT resistors and capacitors I have lots of but only 3 sensor chips. Fortunately they’re not too tiny!