I’m currently also working a retrofit for my MetOne rain gauge using an (unfortunately, think) obsolete 1-wire device, the DS2423 counter/4K memory, to count bucket tips on my Model 370 rain gauge. It’s really a shame Dallas/Maxim doesn’t make this device anymore because (1) it already takes care of any contact bouncing, it works over just with 2 wires (DATA and ground) common), and (3) the current count is non-volatile by using a 3 volt coin cell even if the DATA wire is disconnected. Sweet! Before, this rain gauge was just connected directly to MetOne’s commercial weather main hub, which apparently took care of that issue.
Being in western Washington state, on this side of the Cascade mountain range, we see a lot of rainfall here, though not as much as people think. Still, there have been MANY times when I wonder just how much rainfall we get here in our particular microclimate in Redmond. The 1-wire protocol is PERFECT for this application since no other power is required other than a 3 volt coin cell to keep the count in the DS2423’s memory, and only a signal (1-wire data) line and ground (common) wire are required for operation. And, it works fine over the 25 feet of cable I have to the main board.
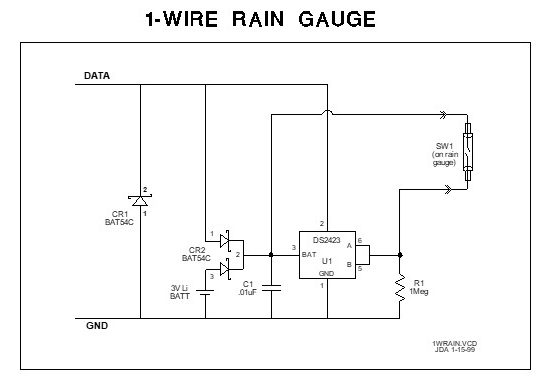
I’ve designed a printed circuit board using Kicad using basically this schematic from a Dallas Semiconductor article from long ago. Since I have some free samples of BAT54S Schottkey barrier diode arrays lying around, I used those in my PCB design instead of the BAT54C version shown in the image on the left. The image below is the result of my work in KiCAD. The schematic isn’t quite finished yet; the terminal block connections aren’t labeled. but the terminals 3 and 4 connect to the rain gauge reed switch and 1 and 2 connect to the Microlan (AKA the 1-wire bus).
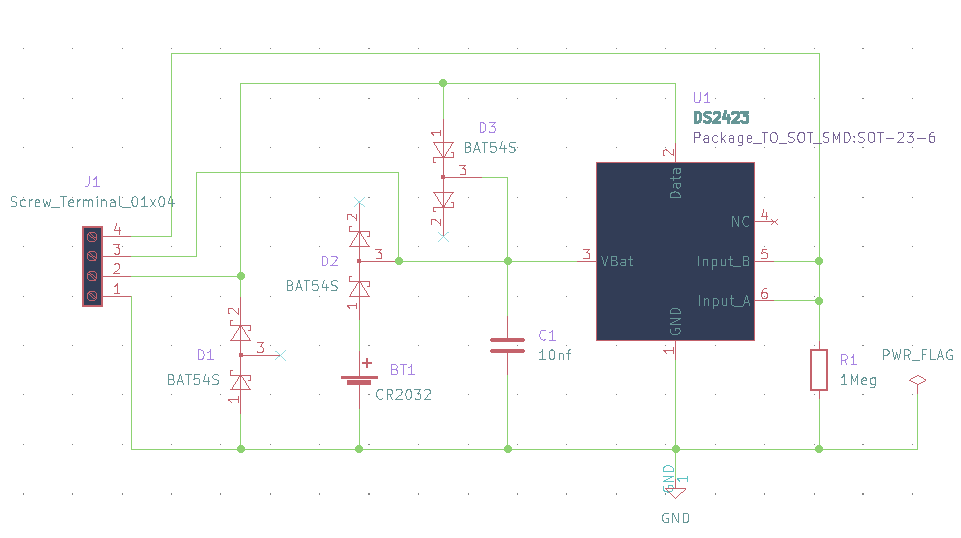
It’s been a while since my last post on this project; have been busy with outside projects for most of the summer, and this summer in the Seattle area has been the 4th longest and driest on record. So, now that cooler weather is here, and the fact that we’ve had some significant rainfall lately, I figure it’s time to at least get busy with the rain gauge project. So, after learning how to use KiCad and successfully sending Gerber files to JLCPCB for the boards (5 of them for $2 and only like $2 for shipping!). The true test will come when try the fit of the board into the MetOne anemometer housing. You might be wondering why I chose to use BAT54S Schottky diodes instead of BAT54C ones in the first schematic? The reason is I had several on-hand so it made no sense to order and pay shipping for a few diodes.